Blog

The Principles of Vae's eCommerce June 05, 2009

Today we're going to do a brief summary of Vae's shopping cart flow. Vae's integrated eCommerce is a framework that is both flexible and powerful. We've outlined the shopping cart flow completely in our documentation, but this will serve as a brief run-through.

Adding Items to the Cart

The <v:store:add_to_cart> tag outputs a form that, when submitted, will add an item to the customer's shopping cart. You might wonder how Vae detects what information to pass along to the cart. The answer lies in this tag's attributes. Information like the item name, price, weight, and many other details can be passed on to the cart via attributes. See the <v:store:add_to_cart> documentation page for a full list of available attributes.

The Shopping Cart

The shopping cart itself can be rendered using the <v:store:cart> tag. Within these tags, a <v:store:cart:items> tag can be utilized to output the information about each item that has been added to the cart. Any information passed along through the <v:store:add_to_cart> tag is accessible by this tag. Here's some sample shopping cart code that would exist within <v:store:cart> tags:

...
<ul>
 <li>Remove</li>
 <li>Image</li>
 <li>Item Description</li>
 <li>Qty</li>
 <li>Price</li>
 <li>Total</li>
</ul>
<v:store:cart:items>
 <ul>
  <li><v:checkbox path="remove" /></li>
  <li><v:img path="image" /></li>
  <li><v:text path="name" /></li>
  <li><v:text path="option_value" />
  <li><v:text_field path="qty" size="1" /></li>
  <li>$<v:text path="price" number_format="2" /></li>
  <li>$<v:text path="total" number_format="2" /></li>
 </ul>
</v:store:cart:items>
...

It's that easy to list out your items. Notice that Vae lets you style our output any way you like. As with any page you code with Vae, no barriers exist between you and your CSS/HTML. 

Registration

It's usually necessary to collect billing and shipping information from your customers. This information will be sent along to the payment and shipping methods you set up in the Backstage. It will also appear on invoices that Vae creates. Within the <v:store:register> tag, Vae looks for appropriately named text fields which the customer enters their information. As an example, here's how you'd collect the customer's billing city information:

<v:text_field path="billing_city" required="true" />

Checkout

The <v:store:checkout> tag creates a form for the customer to confirm the order information, and also select from the available payment and shipping methods. You may again use <v:store:cart:items> to output the items in your cart. Also useful,  <v:store:payment_methods_select /> creates a select menu populated with the Payment Methods setup in the Backstage, while <v:store:shipping_methods_select /> is populated with the available Shipping Methods.

There's More

Vae's elegant solution to eCommerce doesn't stop here. Need to accept coupon codes? Want to save user registration so the user can login in the future? This and much more is possible. Browse our eCommerce documentation for a full review of what you can do with Vae's eCommerce power.

Running MySQL-Backed Apps on Vae June 03, 2009

Vae’s blogging capabilities meet the needs of 90% of our designer’s clients. We know that sometimes a client demands third party software, such as Wordpress. Because we don’t want our designers to create a separate webspace just for a single application, we’ve made it possible to make a MySQL database.

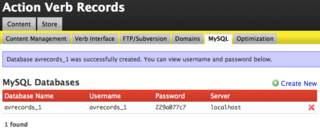
To do this, open the Backstage of your website and navigate to the MySQL subtab.  Click the ‘Create New’ and Vae will create you a new database. The database name, username, and password will all shown on the MySQL screen tab now:

mysql

For security purposes, we don’t currently give designers the ability to have any more control over their MySQL databases than on this screen. We do allow the creation of multiple databases, however. If you’d like more specifics on what you can and can’t do with MySQL in Vae, contact your Account Manager or shoot us an email.

The 5 Different Conditions <v:if> Can Test For May 28, 2009

Because it is so useful, today we're going to do a refresher on how to use the <v:if> tag. The <v:if> tag is Vae's conditional tag which renders some content only if a certain condition is met. There are five different tests the <v:if> tag is capable of.

Here they are:

  1. path - This is likely the most common attribute you'll use. It tests whether or not a specific value is set.
    <v:if path="address">
    Our address is: <v:text path="address" />
    </v:if>
  2. param - This checks to see if a GET or POST parameter has been specified. For example if a page is listing search results, we could do something like:
    <v:if param="query">
    Search Results for <v:text param="query" />
    </v:if>
  3. total_items - Tests against the number of items in a Collection.
    <v:if total_items="4">
    Add some thing else to your cart! Your fifth item is free.
    </v:if>
  4. id - Tests against the ID of the current entry.
    <v:if id="23552">
    Please keep this item out of reach of small children.
    </v:if>
  5. is - Checks the value of the path or param value.
    <v:if path="location" is="New York">
    We provide free shipping in New York!
    </v:if>

Pretty cool eh? You can also place <v:else> tags within <v:if> blocks to tell Vae what to render if a condition doesn't exist.

Scheduling A Blog Post May 26, 2009

Sometimes is it necessary to publish a blog post at a later date, instead of instantly. While it has always been possible to do this manually, Vae recently added the scheduling feature, which makes it possible to enable/disable entries in a Collection at a specified time and date. Say for example you are debuting a new product on the Fourth of July, and you'd like to inform your customers of this immediately after it becomes available for purchasing. Vae lets you schedule a blog post that is made visible immediately on July 4th. Since this functionality is available for any Collection entry, you could also schedule the availability of the product itself.

Here's a tutorial on how to schedule an example blog post for Action Verb Records, our fictional record store.

Here we're adding a new post:

Note that we've opted to disable the entry. We did this by clicking the green dot at the top of the form, changing it to red. After saving this entry, we'll schedule it:

Finally, we can now see that our post is disabled but is schedule, as indicated by the clock icon:

As stated before, scheduling is not limited to blog entries. Because Vae makes no assumptions about what you're doing with your content, a Collection of Blog entries has the same available options as a Collection of Albums, Employees, Planes, Trains, or Automobiles.

The <v=> Tag May 18, 2009

Vae’s shortcut tags are well documented in our Documentation and Integration Center, but we’d like to take a moment to remind you just how useful the <v=path> tag can be. While the tag can be used anywhere in your HTML/XML, it’s used most often to insert content into a tag’s attribute. This property of the shortcut tags makes it possible to solve many problems that traditional CMS platforms do not address.

One example of this is injecting Vae content into a Lightbox image viewer. Lightbox is one of the many JavaScript libraries that make it possible to view your pictures in pretty modal popups. Once you have the Lightbox JavaScript libraries included in your document, the code to display a picture with Lightbox looks like this:

<a href="image.jpg" title="my caption"><img src="image_small.jpg" /></a>

With’s Vae’s shortcut tag, we can easily insert the path to an image that is managed by Vae. Here’s what it might look like:

<a href="<v=picture>" title="<v=caption>"><v:img path="picture" width="50" height="50" /></a>

No problem! Vae’s shortcut tags can make your life easier, so it’s worth reading up on them. If you want the full list of capabilities (like accessing Permlinks or injecting PHP), see the shortcut tags' documentation page.

What's A Permalink? May 15, 2009

Permanent links, or “Permalinks”, were first popularized in the world of blogs as a way to link back to individual blog posts. In Vae, designers use permalinks to link to individual entries in a collection.

Why use them? One reason is that they can keep your address bar looking much prettier. Instead of a confusing address with a long string of identifying characters, your address can look something like: http://www.mydomain.com/clean/permalink

Permalinks are also a good practice if you’re concerned about SEO. Search engine spiders give value to addresses that your links produce. Creating permalinks with meaningful names could result in your site appearing higher in search engine results.

For more information on how to use Permalinks in Vae, see our documentation page on Permalinks.

Introducing Your Client to Vae May 14, 2009

Every designer that builds a website on Vae will eventually have to show their clients the Vae interface.  Here's a checklist of things you might want to do before introducing your clients to Vae.

  1. Prepare Vae for them. Under the Users tab, create a user account for the client to login to their site’s Backstage. When creating the user account, Vae will allow you to restrict what the user will have access to. If you know a user will never need to use a certain area of their Backstage – like if their site doesn’t have any eCommere, so they won’t be using the Store Tab – you might want to uncheck the applicable checkbox when creating their account. This makes the Vae experience more straight-forward for your user.  Generally, clients will not need access to the Site tab.
  2. You might also want to hide or freeze data that they’ll never need to update. You can hide or freeze a Collection or Structure under the Site tab. This ensures that no important content is edited by mistake.
  3. Create External Structures that reference any other websites they’ll need access to. If they have an external Wordpress blog, create an External Structure that points to the login page for that site. Creating these Structures makes it so your client needs to keep only one link bookmarked – their site’s Backstage. 
  4. Show them the Usage/Billing tab. Make sure your client knows where to update their credit card information, how to change their plan, and where to keep tabs of their usage.
  5. Introduce them to the Content Tab. This is likely the tab that they’ll frequent the most, as it’s where all content changes take place. Explain what each Collection and Section contains and any validations that you’ve created. If it’s relevant, make sure you show them how to enable, disable, and schedule Collection Entries.
  6. Don't forget to show them the Newsletter, Store, and Customers tabs, if their site utilizes those features.

These steps should ensure that your client loves Vae as much as you do.

Snippet: adding a Show All option to a page select dropdown April 13, 2009

Someone asked how to add a Show All option to the page select dropdowns generated by VaeML. Personally, I would place Show All as a link next to the dropdown, but if you really wanted to do it, here's how I'd go about it:

Page: 
<v:select id="pageselector" onchange="if (this.value == 'all') { window.location.href='/my_show_all_url'; return false;}">
<option value="all">Show All</option>
</v:select>